Working with Sprites
Introduction
Before going any further, I'd like to point out that this page is geared towards a specific audience: programmers and those who are working with them to create software (including games). By nature, this is going to get somewhat technical; if you don't understand what's being discussed here, then the odds are that you're not in the group being addressed, and thus don't need to worry about this stuff.
The Problem
As you probably know, a "sprite" is a small(ish) graphic that's used to create a more elaborate image, usually as part of a game. For example, in the classic arcade game Space Invaders, every alien is depicted using a sprite. You don't need a unique sprite for each alien, just the base graphic.
But, there's a catch with using sprites. Many software toolkits, such as the Windows GDI system and others like it, don't naturally have the ability to depict transparent objects. This means that your sprites are always completely opaque and square. This worked okay when games used a solid background (usually black), but for modern games it's rather tacky.
![]()
Could be better.
The Solution
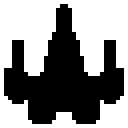
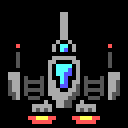
One of the popular solutions to this problem was to paint the graphic twice. The first pass would use a black and white version of the graphic to mark where the new pixels would be drawn, and the second pass would color those pixels in. If you want to be fancy about it, the monochrome image is known as the AND mask, and the colored version is the XOR mask, after the binary AND/XOR operations being used.

AND Mask |

XOR Mask |
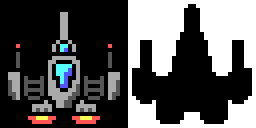
In order to perform this technique, two versions of the image are needed - an AND mask and the XOR mask. Often, these are stored as a single image, with the AND mask positioned to one side of the XOR mask. This way, the program could paint both images using a single resource handle. A slightly more complicated (and thus much less common) technique is to use a specific color as a stand-in for the transparent color value, then split the image into its AND/XOR masks while you're loading it.
The biggest problem with having the AND/XOR masks separate is editing: any change made to one mask needs to be copied onto the other. Depending on how complex the images are, the two masks could easily become mismatched during a long editing session.
Mike's Sprite Editor comes with a pair of tools to help with this. These are found in the Effects menu, under the Sprite Tools menu. The "Create AND/XOR Masks" option will split the current image into the two masks, properly transliterating the transparent areas into their correct colors. Note that you can choose where the AND mask is positioned relative to the XOR mask - the example below places it to the right, but you can put it to the left, above, or below the XOR mask.

|

|

|
Then you have the "Merge AND/XOR Masks" option, which does the reverse. The result will be an image with 1-bit transparency.
Since the AND mask is always completely monochromatic, the editor can usually guess where it's located. If there's more than one possible canidate, it'll ask you for its location before proceeding. Don't worry about selecting wrong: you can just perform an undo and try again.

|

|

|
Other Tools
The AND/XOR masks aren't the only issue that artists may encounter when creating their sprites. Since it's impractical to have a series of image files when one is really all you need, artists often create sprite sheets. These are a series of similar pictures that are all related in some way. An example would be an hourglass with moving sand grains. To display the image as an animation, the program would just add a few pixels to the location of the source graphic when it draws it.
To help with this, you can use the Tile Image tool found in the Sprite Tools menu. This will bring up a dialog that asks for more information (ie, how many images across and down to make) and then it'll copy your original base image for you, transparency and all. Once you've done that, you can simply edit each frame as needed.
Additionally, there is also the Rearrange Tiles tool, which allows you to shuffle the location of the tiles in your image. This way, you can work on the tiled images in a whatever way is convenient for you, then easily reorder them however they'd be most useful in your projects. See this page for more information about this utility.