Grid Options
Many, if not most, image editors have the ability to display a grid over the image. This helps their users see exactly where they're working. Most of the time, these grids only appear when the image is substantially magnified, allowing the user to see the boundaries of every pixel.
Mike's Sprite Editor also has this feature, though it's normally disabled. To toggle the grid on or off, select the "Enable Grid" option in the View menu or use the keyboard shortcut CTRL + G. By default, the grid only becomes visible once you've zoomed in to at least 800%.
But, this might not always be useful or convenient, so these settings can be changed using the Grid Options dialog, also found in the View menu.
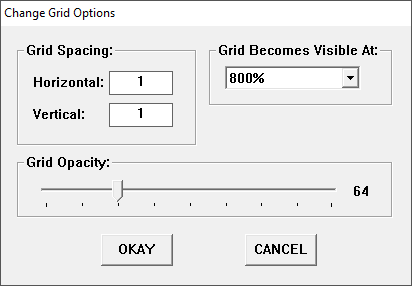
The Grid Options Dialog
Using the Grid Options Dialog
This is intended to be fairly straightforward. You can set how many pixels there are between the grid lines (default: 1px) and how zoomed in you need to be for the grid to be drawn, and how much the grid lines contrast with your image (default: 128). The greater the number, the more the lines contrast with the image. Just be careful: small grid sizes don't really display well at low magnifications, and turning the contrast up too much might make it uncomfortable to work with the editor for very long.
Here's an example to give you some ideas. Let's say that you want to draw some text sprites. These will be used to print messages in a game you're making. You know that each letter will need to be drawn within an 8px by 12px box in order to make it fit on screen, so to help you make these sprites, set the grid's size to 8px wide and 12px tall. Adjust the zoom settings so that you're comfortable with them, and now you'll have a set of neat little boxes to work in.
Useful, no?
It's important to remember that changing these options only affects this instance of the editor. Once you close the editor's window, these options will reset to their defaults. If you want to make these changes permanent, use the Preferences Manager.